
Are you worried about the safety of your home or business, especially when you’re away? Imagine coming back to find everything just as you left it secure, monitored and under control.
That peace of mind is exactly what Night Owl Cameras Wired systems offer, giving you reliable and high-quality surveillance that you can trust.
In this guide, we’ll walk you through everything you need to know about installing your Night Owl wired cameras, from unboxing to setup.
Whether you’re a tech-savvy user, homeowner, a renter or a business owner, this step-by-step guide will make installation simple, practical and stress-free, helping you take full control of your property’s security.
Why Choose Night Owl Wired Cameras?
Choosing the right security system is crucial for protecting your home or business. Night Owl Wired Cameras offer reliability, clarity and professional-grade performance, making them a top choice for homeowners, renters and business owners alike.
Here’s why they stand out:
Consistent Power Supply – No Dead Batteries
One of the biggest advantages of Night Owl Wired Cameras is their continuous power supply. Unlike wireless systems that rely on batteries, wired cameras operate 24/7 without interruptions.
This ensures your security coverage never falters, giving homeowners and business owners peace of mind even when they’re away.
High-Definition Video Quality
Clear, crisp video is essential for effective security. Night Owl Wired Cameras deliver high-definition footage that captures every detail, from faces to license plates.
Tech-savvy users will appreciate the quality when accessing live streams or reviewing recorded footage remotely.
Ideal for Homes, Apartments and Small Businesses
Whether you’re securing a single apartment, a large home or a small business, these cameras are highly versatile. They can cover multiple entry points and adapt to different property layouts without compromising performance.
Robust and Reliable Network Connection
A strong network connection ensures smooth streaming and uninterrupted monitoring. Night Owl Wired Cameras provide dependable connectivity, allowing you to check your property anytime, anywhere without frustrating delays or drops.
Tools & Materials You’ll Need
Before starting your installation, it’s essential to gather all the necessary tools and materials. Having everything ready makes the process smoother and ensures your Night Owl Wired Cameras system works efficiently from the start.
Night Owl Wired Cameras and DVR/NVR System
The core of your setup is the Night Owl Wired Cameras themselves, along with the Digital Video Recorder (DVR) or Network Video Recorder (NVR) system. These devices store and manage your video footage, making it easy to access recordings whenever needed.
Power Supply and Cables
Reliable power is crucial for continuous operation. Make sure you have all the required power adapters and cables included with your Night Owl system to connect each camera securely.
Drill, Screws and Anchors
For mounting your cameras, you’ll need a drill along with screws and wall anchors. These ensure that your cameras are installed firmly and safely even on different surfaces like drywall, wood or concrete.
High-Definition Multimedia Interface (HDMI) / Monitor for Setup
A monitor connected via HDMI helps with real-time setup, camera angle adjustments and DVR configuration.
Smartphone or PC for Remote Access
A smartphone or PC allows you to manage your Night Owl Wired Cameras remotely, set alerts and view live feeds from anywhere.
Pre-Installation Tips
Before you start mounting your Night Owl Wired Cameras, a little planning can save time and prevent common mistakes. Proper preparation ensures that your cameras provide optimal coverage and function reliably.
Plan Your Camera Placement
Identify key areas that need monitoring, such as entrances, driveways, backyards or blind spots.
Think like someone trying to enter your property unnoticed. Placing cameras in these areas maximizes security for homeowners, renters, and business owners.
Ensure Power Outlet Access
Since wired cameras rely on a continuous power supply, make sure outlets are available nearby. If needed, use extension cables or plan routes that keep wires concealed and safe from damage.
Map Your Cable Routes
Plan how the cables will run from each camera to the DVR/NVR. Avoid running wires across high-traffic areas or locations exposed to weather. Proper cable management keeps your setup neat and minimizes accidental disconnections.
Prioritize Safety
While installing, avoid high-voltage areas, use proper ladders or supports and wear protective gear if needed. A safe installation process ensures that your Night Owl Wired Cameras operate effectively without accidents.
Step-by-Step Installation Guide
Installing your Night Owl Wired Cameras doesn’t have to be complicated. Follow these steps to set up your system efficiently and ensure full coverage of your property.
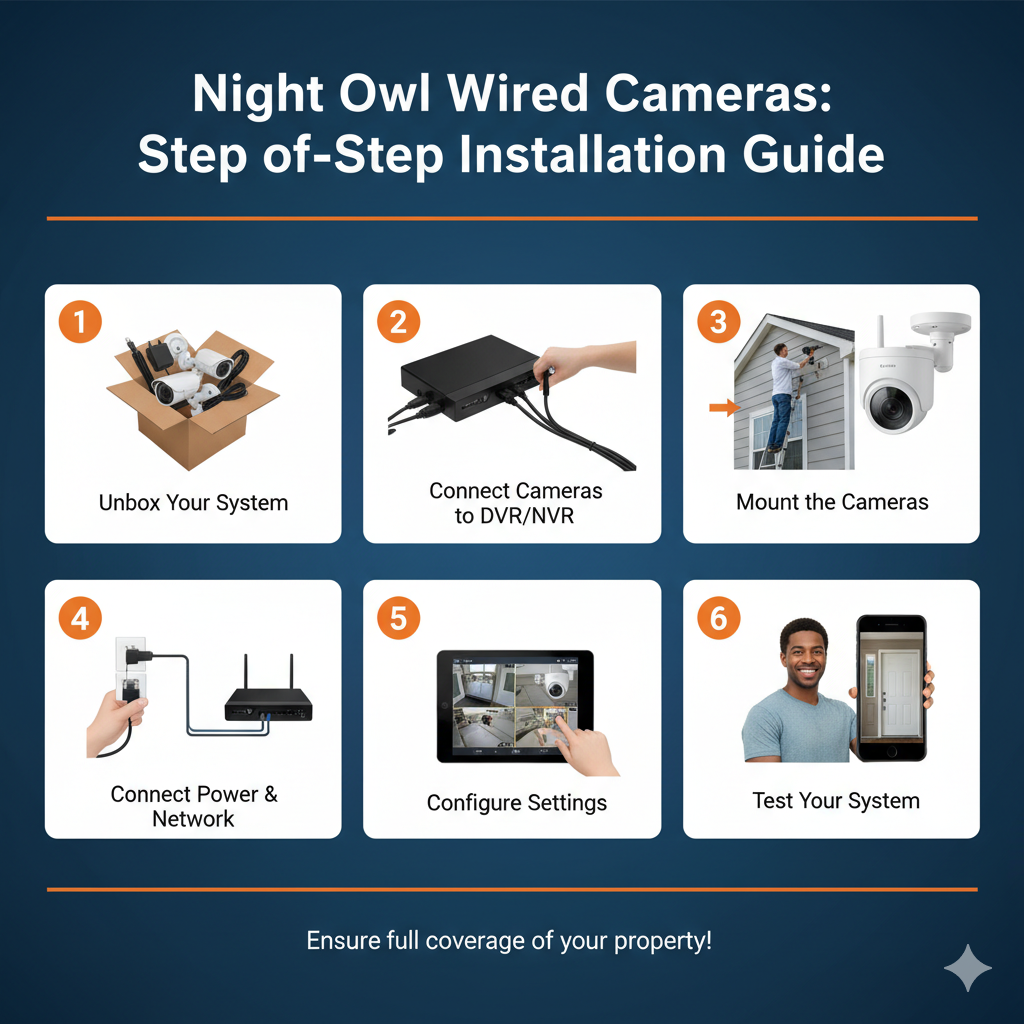
1. Unbox Your Night Owl System
Carefully unpack all components, including your cameras, DVR/NVR, power adapters and cables. Lay everything out on a clean surface and check that all items listed in the manual are present.
Taking a moment to verify components avoids delays later and ensures you won’t need to stop midway to search for missing parts.
2. Connect Cameras to the DVR/NVR
Run the video and power cables from each camera to the DVR/NVR system. Make sure each connection is secure and that the wires are not pinched, twisted or exposed to potential damage.
For long cable runs, consider using cable clips or conduits to keep everything neat and protected. Proper connections at this stage prevent signal loss and power interruptions.
3. Mount the Cameras
Use a drill, screws and anchors to securely mount each camera at your planned locations. Adjust each camera’s angle to cover entrances, driveways, windows or other vulnerable areas.
Take your time to ensure each camera has an unobstructed view. For outdoor cameras, consider mounting them under eaves or shaded areas to protect from weather and direct sunlight.
4. Connect Power and Network Cables
Plug in all camera power adapters and connect your DVR/NVR to your home or business network. If you plan to use remote monitoring via smartphone or PC, make sure your internet connection is stable.
Labeling your cables can help identify which camera connects to which DVR channel, making troubleshooting easier later.
5. Configure Settings
Power on your system and use your monitor or mobile app to configure your DVR/NVR settings. Set recording schedules, motion detection zones and alert notifications according to your needs.
Adjust sensitivity levels to reduce false alerts from pets or moving trees. Fine-tune each camera’s view to ensure maximum coverage of critical areas.
6. Test Your System
After setup, check the live feeds from each camera to ensure everything is working as expected. Walk around the monitored areas to verify motion detection and alerts. Review recorded footage to confirm image quality, lighting balance and coverage.
Making adjustments at this stage ensures your Night Owl Wired Cameras deliver reliable, high-quality surveillance every time.
Troubleshooting Common Issues
Even with careful installation, you may encounter minor issues while using your Night Owl Wired Cameras. Knowing how to troubleshoot common problems ensures your system remains reliable and effective.
Camera Not Powering On
If a camera doesn’t turn on, start by checking that all power cables are securely connected. Make sure the power adapter is properly plugged into both the camera and the DVR/NVR.
Ensuring a stable power connection prevents unnecessary downtime and keeps your surveillance system operational around the clock.
No Video Feed
When a camera shows a black screen or no signal, first ensure the video cable is properly connected to the DVR/NVR.
For tech-savvy users, inspecting the cable for damage or signal interference may also help restore video. Properly securing cables and connections ensures smooth, uninterrupted monitoring of your property.
Network Connectivity Issues
For remote access via smartphone or PC, ensure your network connection is stable. Restart the router if feeds are lagging and confirm the DVR/NVR is properly connected.
By addressing these common problems, homeowners, renters and business owners can maintain the performance and reliability of their Night Owl Wired Cameras at all times.
Maintenance Tips for Longevity
Keeping your Night Owl Wired Cameras in top condition ensures they provide reliable security for years to come. Regular maintenance helps prevent issues and maintains high-quality video performance.
Keep Lenses Clean
Dust, dirt or smudges can reduce image clarity. Gently clean each camera lens with a soft, dry cloth on a weekly or biweekly basis to maintain sharp, clear footage.
Check Connections Periodically
Inspect all cables, power adapters and network connections to make sure nothing is loose or damaged. Secure any cables that may have shifted or been exposed to wear over time.
Update Firmware Regularly
Night Owl frequently releases firmware updates that improve performance, add features or fix bugs. Check the official Night Owl website or app to ensure your DVR/NVR and cameras are running the latest software.
Test Camera Angles and Settings
Seasonally review each camera’s placement, angles and settings. Adjust motion detection zones or recording preferences as needed to maintain full coverage of your property.
By following these simple maintenance tips, homeowners, renters and business owners can enjoy consistent, high-quality security from their Night Owl Wired Cameras year-round.
Conclusion & Call-to-Action
Installing Night Owl Wired Cameras is one of the smartest steps you can take to protect your home, apartment or business. With reliable power, crisp high-definition video and robust connectivity, these cameras give you peace of mind knowing your property is always monitored.
By following this guide, you can confidently set up your system, troubleshoot minor issues and maintain it for long-term performance.
Don’t leave your security to chance, take control today. Protect what matters most with Night Owl Wired Cameras.
Secure Your Space Now!